Tuesday, August 7, 2012

A Modern Birthday

I recently did a Call of Duty MW3 cake for my nephew. 


I used the cover of the video game case as my staring point.  I rolled out dark gray fondant, and cut out a silhouette of the army guy.  Then, I rolled out white and green fondant and cut out the letters.  I used the Snow White Buttercream recipe from one of the Wilton Cake Decorating Yearbooks. 


I didn't do a crumb coat, but for normal customers I definitely would.  The flavor of the cake is Orange Creamsicle.  If you would like to have the recipe please let me know.

Tuesday, May 29, 2012

Can You Feel The Love Tonight?

Hello There!

I worked on a cake last week for my sweet niece Rayann.  Mommy said that she requested Simba and Nala.  So, I found out whether or not it was baby Simba and Nala or adult Simba and Nala and went to town.  The first thing I did was print out a picture of Simba and Nala.  I then laid a piece of wax paper over the top and traced the image with a permanent marker.  I put the original print out under another piece of wax paper.  I then just took my traced image and placed it over rolled fondant, and cut out each section.  I took the sections and placed them on top of my printed image so that I knew I had the placement right.  I started with the small things like the eyes and ears.  Then, I place the body over those in sections.  I place the complete fondant image in the fridge to harden.


I had my cake in the freezer.  So, I got that out and did a crumb coat and a regular coat.  After it had the icing on, I placed the image directly from the fridge onto my cake.  I then drew in the details with a food color/vanilla mixture.


Monday, May 14, 2012

It's a Bieber Fest

This past week, I made another Bieber cake for the same girl I did last year's cake for.  I jokingly told her mom that next year's cake had to be something different because I was running out of ideas for Bieber. 

I used the Frozen Butter Cream Transfer technique for the first time.  It turned out ok, but I definitely need some practice on it.

What you need for the FBCT is wax paper or freezer paper, a print out of what you want your transfer to look like and of course butter cream icing. 

I printed out a Justin Bieber coloring sheet off the internet...yes there are coloring sheets of the boy.  I really don't want to know what other things your can get Bieberized.


I taped the sheet under my freezer paper, and I outlined the picture with black butter cream.  After this I covered the whole image in pink butter cream because my fondant was going to be pink per the birthday girl's request.  I could have also colored each part of the picture a different color, like brown for hair and peach for skin.


Then, place another piece of freezer paper on top of your image and pop it in the freezer.

I made my cake and then brought out the transfer.  Definitely do this right when you need it because if you bring it out too soon the transfer will start to become soft and you might not be able to transfer it to your cake successfully.  I learned this because I had made cute flower and heart shapes, but when I got around to trying to put them on the cake they melted and didn't hold their shape well.  Lesson learned for next time.


Here is a pic of last year's Bieber cake just in case some of you weren't around back then.


Friday, April 27, 2012

Pulling Into The Station - Cake Decorating Stop

For our first stop, please enjoy the tweeting and cakes.  Stop by Bird On A Cake.


Take a look at these cute rapunzel cupcakes.  I think just about anybody could make these.


Please take a look around at this next stop.  It's not just cakes, it's jessicakes.  Please visit Jessicakes.
Isn't this cake she created simple yet breathtaking?


If you're looking for something handmade and sweet, look no further than our next stop.  Please visit Sweet Handmade Cakes.


Take a look at this pink cake.  Aren't the edges just perfect?


Thanks for stopping by.  I hope you enjoyed how the sweet cakes and treats today.


Thursday, April 5, 2012

Here a Chick, There a Chick!

I found inspiration for some cute little cupcakes on Pinterest from the site Bird On A Cake.  Aren't her cupcakes just so cute? 


I did mine just a little different.  When you're trying to get a whole bunch done and you have lots of help from little hands, you tend to take shortcuts.

You will need a cake mix, yellow sugar, something to use for the beaks (I used sprinkles that were shaped like Tigger), chocolate chips, (icing and food color not shown).  My picture shows white cake mix, but I actually used yellow for my cupcakes.  Use whatever mix you like, or if you're ambicious make cupcakes from scratch.


I made mini cupcakes because I figured the kids from daycare really didn't need that much sugar.

I took my canned icing, and colored it yellow.  Then, I dipped each cupcake in the icing.  After that, each cupcake was dipped in the yellow sugar.


Bird On a Cake used orange icing for her beaks, but to save time I just used something I had on hand.  Also, this made is easier for little hands to help.  We had an assembly line going, and the cupcakes were finished fairly quickly.


Friday, March 30, 2012

Pulling Into The Station - WXY and Z

Welcome to the final stop along the alphabet.

Our first stop will have you gaining pounds just for stopping by.  Please stop by Whisk Kid.


Just take a look at this thumbprint cookies that she baked.


Our next stop leave you wanting to make more.  Stop on by Vixen Made(I know does not start with X, just work with me here.  It has an X in it.  That's got to count for something.)


Take a look at this repurpose of a spice rack turned paint organizer.


The next stop will leave you thinking of days gone by.  Please stop by Yesterday on Tuesday.


These Easter egg baskets she made are just so cute.

Last but not least, let's travel to the land of Zs.  Please stop by Zaaberry.

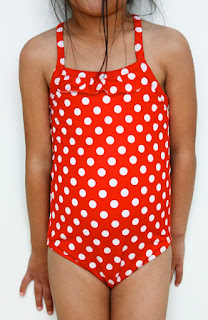
Isn't this swimsuit she made just adorable.

Thanks for stopping by.  Please come again soon.

Thursday, March 8, 2012

Pulling Into the Station - TUV Stop

Thanks for coming by again.  We continue our journey on the alphabet train.

The first stop today is will leave you oohing and ahhing over some cute little girls.  Please visit This Little Miggy Stayed Home.


She writes post about her day to day life living with Lamp, her cute daughter.  Her big sister is Princess Sparkle Pants.  Aren't they both just adorable?  She also does a weekly Special Needs Spotlight and features other families with special needs.  While you're over there, give her a big Texas Howdy.  She is a recent transfer to Texas.


Our next stop is one that will leave you wanting to party.  Please stop by U Create Parties.


Just look at this Cupcake War party they featured.  What a neat idea.  I just love Cupcake Wars.


The final stop today will leave you revived.  Please stop by Vintage Revivals.


Look at this wonderful room tranformation she did which includes a hand-pieced rug.


Thanks for stopping by.  Please join us next time.

Wednesday, February 29, 2012

Pulling Into The Station - P skip Q RS Stop

Welcome Back! It's time to go on another adventure together. Our first stop is verying interesting. That's right, we're going there. If you have checked out Pinterest yet you've seriously got to stop by there.


You can find things from crafts to movies to food like this.

The cool part is you can pin it and come back to it later. You can find me at Pinterest, here. Come follow me.

Would you believe I couldn't find any blogs that started with Q. If you know of one out there, let me know. So, the next stop will leave you wanting to run with scissors. Please stop by Running With Scissors, but be careful.


Just look at this cute rainbow dress she created.


On the last stop, sit a while and take a sip of pink lemonade. Please stop by Serving Pink Lemonade.


Look at these cute ball Valentine's she made. I have already pinned this to Pinterest.


Hope you enjoyed the stops today.


Wednesday, February 15, 2012

Quilt Boards or Kids Travel Felt Boards

I got my idea from A Bee in My Bonnet when I saw her mini design boards HERE. I pinned them for something to do for my mom for Christmas.
After looking at them for a little bit, they reminded me of the felt boards in my Sunday school classes when I was a kid so I ran with it, and made my own thing. For my kids and my niece, I made travel felt boards which included mini shapes to use for counting or being creative and coming up with their own shapes. To make the boards pull double duty, I spray painted the back with chalk board paint so they could have a travel chalk board as well. I did end up making some boards for my mother and sister-in-law to use as quilt boards that did not include the felt pieces. They did get a chalk board, though. Because everyone needs chalk boards. Hope you liked my tutorial.

Friday, January 13, 2012

Pulling Into The Station - MNO Stop

Ok, now that everyone is back from taking holiday leave, let's take a little trip to the station. Our first stop leaves you wanting to lay around making jewelry and soaking up the sun. Please stop by Mich L. in L.A.
She takes mystery items and creates very unique jewelry pieces out of them. She used a mask to come up with the shiny leaf beads on this necklace.
This next stop will leave you feeling like your more than just a housewife. Please stop by Not Just A Housewife.
She made this lovely hidden drawer shelf out of recycled boards.
Our last stop of the day will help you out if your not quite the normal bride. I'm not talking Bridezilla, I'm just talking you want a wedding that doesn't follow the traditional flow of weddings. Please vist Offbeat Bride.
They offer information about real brides, and what made their weddings so unique and special to them. Like these unique invitations.
Thanks for stopping by as always, and come back for more stops along the way.